Editor extension integration
Integrating Alova's editor extension can make it more powerful.
- Automatically generate request code and response data types, and experience smart prompts for interface data in js projects.
- Embed API documents in the code to experience the effect of checking and using APIs.
- Update APIs regularly and actively notify front-end developers, no longer relying on server-side developers to notify.
Demo video
Install
Install VSCode extension (supports swagger-v2 and openapi-v3 specifications)- npm
- yarn
- pnpm
npm install @alova/wormhole --save-dev
yarn add @alova/wormhole --dev
pnpm add @alova/wormhole -D
Install @alova/wormhole and alova's vscode extension at the same time to enjoy the complete features. @alova/wormhole provides automatic generation features. The vscode extension can quickly call @alova/wormhole and provide shortcut keys for quickly finding interface documents in the editor.
If you are using an editor such as WebStorm, you can use @alova/wormhole's commands to automatically generate API call functions, complete TypeScript types of APIs, and API documentation information.
Configuration
When using the extension, you need to specify the input source and output directory from the openapi file, etc. You can create a configuration file in the project root directory, which supports the following formats:
-
alova.config.cjs: a commonjs-standard configuration file, usingmodule.exportsto export the configuration. -
alova.config.js: an ESModule-standard configuration file, usingexport defaultto export the configuration. -
alova.config.ts: a configuration file in typescript format, usingexport defaultto export the configuration.
Currently, using
importorrequireto import other modules is not supported in the configuration file.
The specific configuration parameters are as follows, taking commonjs as an example.
// alova.config.js
module.exports = {
// API generation setting array, each item represents an automatically generated rule, including the generated input and output directories, standard file paths, etc.
generator: [
// Server 1
{
// Input parameter 1: openapi json file url url
input: 'http://localhost:3000/openapi.json',
// Input parameter 2: local url with the current project as the relative directory
// input: 'openapi/api.json'
// Input parameter 3: When there is no direct reference to the openapi file, it is a document url, and the document type must be specified with the platform parameter
// input: 'http://192.168.5.123:8080'
// (Optional) platform is a platform that supports openapi. Currently only swagger is supported. The default is empty
// When this parameter is specified, the input field only needs to specify the document url without specifying the openapi file
platform: 'swagger',
// Output path of interface file and type file. Multiple generators cannot have the same output path, otherwise the generated code will overwrite each other.
output: 'src/api',
// (Optional) Specify the mediaType of the generated response data. Use this data type to generate the ts format of the response with a 2xx status code. The default is application/json.
responseMediaType: 'application/json',
// (Optional) Specify the bodyMediaType of the generated request body data. Use this data type to generate the ts format of the request body. The default is application/json.
bodyMediaType: 'application/json',
// (Optional) Specify the generated api version. The default is auto. The version of the current project will be determined by the alova version installed in the current project. If the generation is incorrect, you can also customize the specified version.
version: 'auto',
/**
* (Optional) The type of generated code. The optional values are auto/ts/typescript/module/commonjs. The default is auto. The type of the current project will be determined by certain rules. If the generation is incorrect, you can also customize the specified type:
* ts/typescript: The same meaning, indicating the generation of ts type files
* module: Generate esModule specification file
* commonjs: Generate commonjs specification file
*/
type: 'auto',
/**
* Globally exported api name, you can access the automatically generated api globally through this name, the default is `Apis`, it is required when multiple generators are configured, and it cannot be repeated
*/
global: 'Apis',
/**
* The host object of global mounting, default is `globalThis`, it means `window` in browser and `global` in nodejs
*/
globalHost: 'globalThis'
/**
* (Optional) Filter or convert the generated api interface function, return a new apiDescriptor to generate the api call function, if this function is not specified, the apiDescripor object is not converted
*
* The type of `apiDescriptor` is the same as the api item of openapi file.
* @see https://spec.openapis.org/oas/v3.1.0.html#operation-object
*/
handleApi: apiDescriptor => {
// Returning a falsy value means filtering this api
if (!apiDescriptor.path.startsWith('/user')) {
return;
}
apiDescriptor.parameters = (apiDescriptor.parameters || []).filter(
param => param.in === 'header' && param.name === 'token'
);
delete apiDescriptor.requestBody.id;
apiDescriptor.url = apiDescriptor.url.replace('/user', '');
return apiDescriptor;
}
},
// Server 2
{
// ...
}
],
// (Optional) Whether to automatically update the interface, enabled by default, check every 5 minutes, closed when false
autoUpdate: true
/* You can also configure more detailed parameters
autoUpdate: {
// Update when the editor is opened, default false
launchEditor: true,
// Automatic update interval, in milliseconds
interval: 5 * 60 * 1000
}
*/
};
Call API
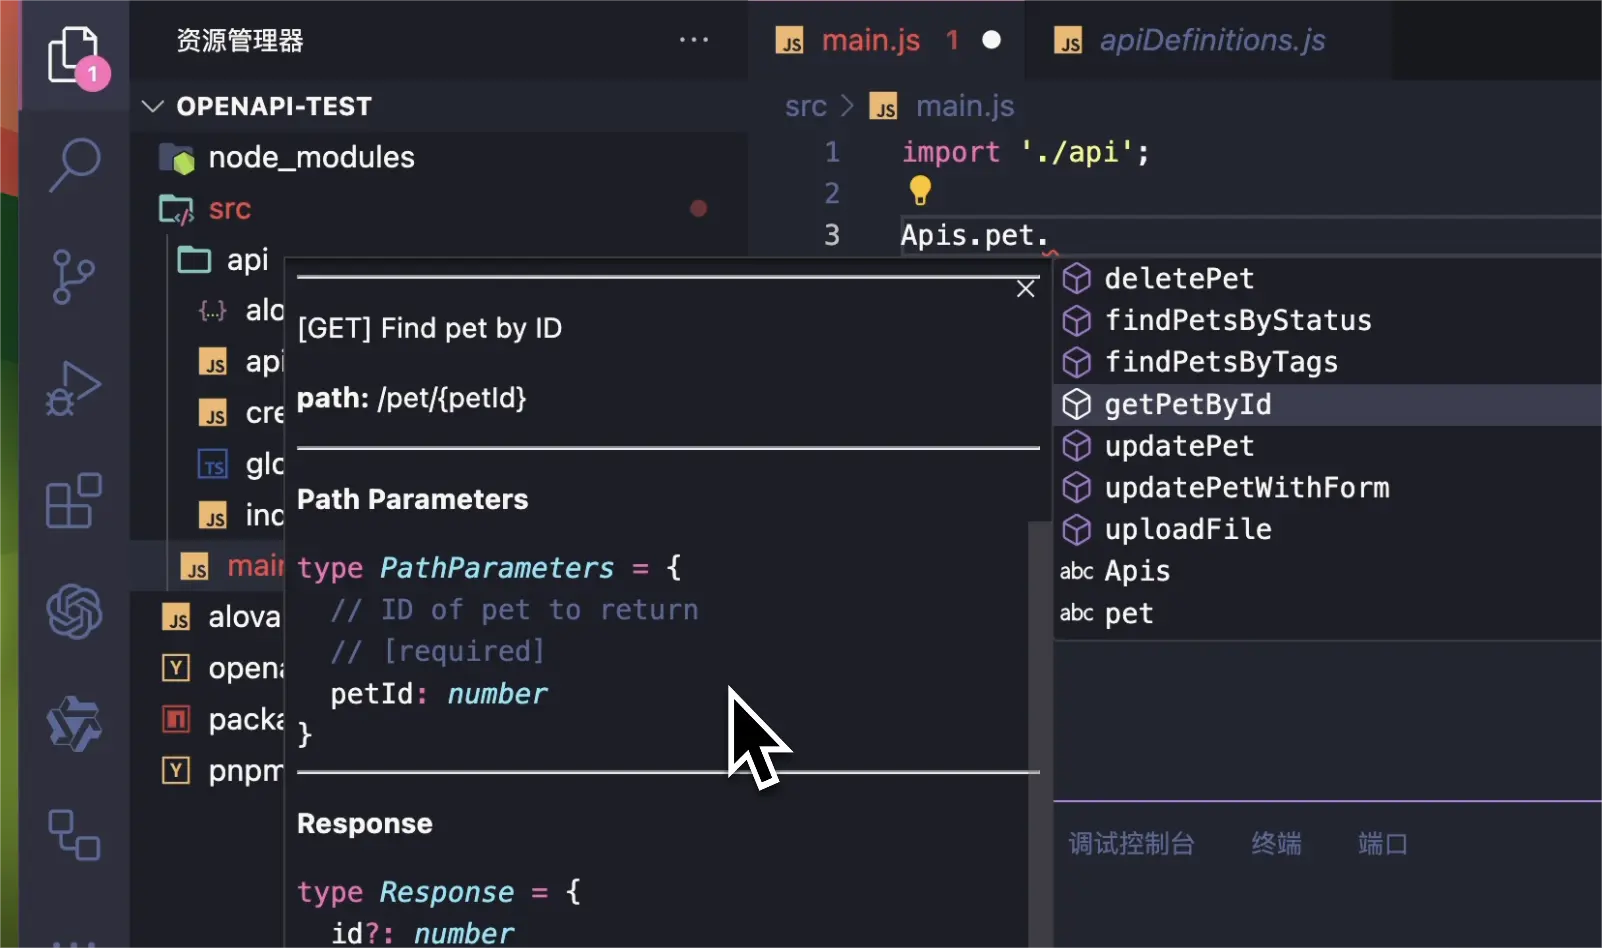
The generated API code is accessed by the global Apis variable by default. You can enjoy the smart prompts provided by the editor to quickly preview the API information, allowing you to check and use the API.

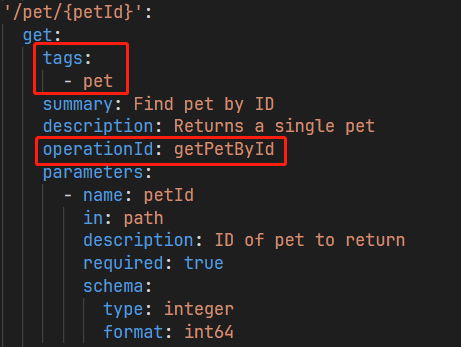
Where pet is the tag of the API, and the API name corresponds to operationId.

First, you need to import index.[js/ts] in the automatically generated directory in the project's entry file.
import './your-generating-api';
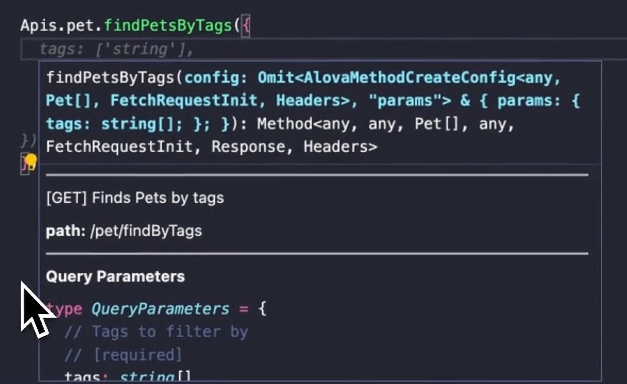
When using the interface, you can specify the request parameters through params/pathParams/data/headers, which will intelligently prompt the parameters required by this interface. In addition, you can also specify other config parameters of the method instance.
useRequest(() =>
  Apis.user.changeProfile({
    // (optional) query parameters
    params: {
      id: 12
    },
    // (optional) path parameters
    pathParams: {
      id2: 20
    },
    // (optional) body parameters
    data: {
      name: 'alova',
      age: 18
    },
    // (optional) header parameters
    headers: {
      'Content-Type': 'application/json'
    },

    // config items supported by other methods
    cacheFor: 100 * 1000,
    transform: response => response.detail
  })
);
Quick access to API
Usually, we cannot know the tag and operationId of each API. In order to quickly access different APIs, you can quickly locate the corresponding API through the description of the target API or the url keyword, and use the trigger word a-> Trigger quick positioning.
Search by url

Search by description

Specify parameters by referring to the interface parameter table
By default, when you access the API function through a-> shortcut, the necessary parameters of this API will be automatically provided. When you call the API function to pass parameters, the vscode editor will automatically pop up the API document for you to fill in the parameters according to the parameter table.

If you accidentally close the API document pop-up, you can put the cursor on the API function and call it again through the shortcut key shift+ctrl+space, and the Mac is shift+command+space.
Set alova parameters
Usually we will set global parameters in createAlova. In the automatically generated code, you can go to ${output}/index.[js/ts] to set it. ${output} is the output directory you specified in the configuration file. This file will not be overwritten when the code is regenerated.
The contents of the index file are as follows:
import { createAlova } from 'alova';
import GlobalFetch from 'alova/GlobalFetch';
import VueHook from 'alova/vue';
import { createApis, withConfigType } from './createApis';

// The alova instance corresponding to the current api, you can modify the parameters here.
export const alovaInstance = createAlova({
  baseURL: 'server parameter in openapi file',
  statesHook: VueHook,
  requestAdapter: GlobalFetch(),
  beforeRequest: method => {},
  responded: res => {
    return res.json();
  }
});

// Reusable method parameter configuration
export const $$userConfigMap = withConfigType({});

/**
 * @type {APIS}
 */
const Apis = createApis(alovaInstance, $$userConfigMap);
globalThis.Apis = Apis;
export default Apis;
You can write interceptors and replace request adapters as usual in createAlova.
One thing to note is that since method instances are automatically generated, you cannot set method parameters such as transform/cacheFor directly when creating a method. To achieve the same effect, you can specify the corresponding parameters in withConfigType({}).
The following is a comparison example.
// Manually define the calling function
export const useProfile = () =>
  alovaInstance.Get('/user/profile', {
    cacheFor: 100 * 1000,
    transform(data) {
      return data.detail;
    }
  });
// Set method parameters for automatically generated code
export const $$userConfigMap = withConfigType({
  'user.profile': {
    cacheFor: 100 * 1000,
    transform(data) {
      return data.detail;
    }
  }
});
user is tag, profile is operationId, you can open ${output}/apiDefinitions.[js/ts] to view all api interface paths.
Old project migration
If you want to integrate the vscode extension in a project that already uses alova, you need to follow the steps below:
-
Generate code according to the openapi specification file first.
-
Replace the alova instance in
${output}/index.[js/ts]with the original alova instance code. -
In the api call function that has been defined in the project, change the import path of the alova instance to
${output}/index.[js/ts].
In this way, you can integrate the automatically generated code without changing the original code.
Notes
-
In a ts project, if you find that vscode cannot correctly prompt, please set
"strictNullChecks": trueintsconfig.json. -
Sometimes the api will prompt as
anytype, you can try to solve it as follows:- Step 1, confirm whether this api is introduced in the entry file.
- Step 2, restart vscode
 Is using alova in your project? please tell me!